Once all the pieces of the ELF cupboard were stained and dry it was just a case of assembling them.
This was sometimes a bit fiddly but always very easy as everything is so beautifully cut and fits together perfectly.
You might notice here the tool of choice is a toothpick/cocktail stick and wood glue. I have one of those tiny glue bottles with the metal top BUT it spends all its time bunged up and drives me crackers so I almost always resort to this method after the first half hour.
The stain is Colron Wood Dye in American walnut. It has a high level of smell so if you can choose a good day and open all the windows it is a help.
I loved the finished long doors with the cross bars. Yes, the 'glass' is in them and is immaculate.
While the stain was drying I started the task of making the curtains to go behind the glass.
I chose some lovely fabric (only just enough) which I had bought as 'antique' muslin. I don't believe everything I read (or pay for) and had no reason to really think it was antique. I decided to wash the fabric first to get out any finish (the size). It quite literally fell into holes! Antique it was then! Luckily I had only cut and washed a small piece and there was just enough left to cut in four to make the curtains - without washing them first!
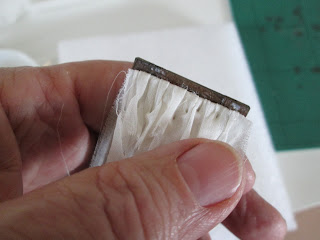
I started by gathering them with a needle and thread but decided I had just as good a result (if not better) by simply wetting with spray starch and pinning to a piece of polystyrene packaging.
I have got a pretty pleater but that wasn't the sort of finish I wanted on these.
Luckily these were my last job of the day so my impatience wasn't tested to breaking and I could just go to bed and leave them to dry overnight.
Next morning I put a little glue on the back of the frames and then pressed them down gently (but firmly) onto the fabric and I went off to do some gardening. This is the only way for me. If I am doing the 'wait for it to dry' bit of a process, I can't just get on with something else in the same room while I wait without keep 'testing' it and eventually getting on with the next step before it is actually ready.
I carefully folded the tops and sides back and trimmed them close to the glue line.
I was a bit concerned that they might not lie down neatly on the cupboard backs and that there would be a bit of a gap. No such issue. the muslin was so fine it almost disappeared between the two pieces of wood.
All the pieces are ready to be polished next month and then assembled in their final home in a couple of months time.
I am really pleased with them all.
The tiny knobs are a joy in themselves. If you want to see more there are extra photos in the album.


Looks absolutely great Em, most impressive mini-joinery, especially with the muslin curtains in place as well. What a lucky find you had with such fine fabric. I've just bought some minutely figured bridal veiling for my house's 'nets', which hangs beautifully but it's nylon and too white for 1948 so I'm going to have to knock it back with a synthetic dye. What's next on your list? I know exactly what you mean about those wretched glue nozzles, you can't go wrong with cocktail sticks IMO! (Our Poundland is currently selling them in packs of six for a quid)
ReplyDeleteThank you, that's so kind. Would coffee work on a nylon fabric? I don't understand all the praise those glue things get - they have never worked for me with fabric or wood glue. Nice idea but rubbish outcome. As you said cocktail sticks get used for all sorts. Thanks for the heads up on Poundland - I brought a zillion back from the States - bought from the dollar shop. Your 'what's next?' has prompted a Post!!
Delete