To be more accurate this is a case of art imitating art. In the movie Josephine's drunken husband Serge breaks down the door of the shop to attack Josephine and Vianne. This is how Roux comes to work for Vianne - replacing the broken glass with wood.
In this world (of minis) rather than just chuck away a perfectly reasonable door - painted so probably not much use for any other project - I decided it was worth a shot at remodelling it.
I cut through the joins at the top and pulled out the offending glass intending to replace it with a wood panel.
I didn't have any wood thin enough.
The search was on.
The material of choice (eventually) was a plastic cover from a spiral bind-it-yourself type book.
You can also see here the other thing I wasn't keen on with this door - there were gaps you could drive a bus through, or an eight knot gale.
I found some trim and added a rebate.
I now had a very unattractive piece of kit.
Paint...????
Green side isn't at all bad - it probably looks like a replacement panel as it doesn't have any moulded shape to it but that's OK, it fits the narrative.
I can't do anything with the strange mark on the bottom right panel - sort of 'knot' in the wood.
This side took four coats and I may go for another one. I started with the Plasti-kote cream gloss paint whose praises I've sung elsewhere. It does not plastic coat!
I let the resultant see-through attempt dry and then lobbed a coat of good old fashioned cream emulsion over. This stuck nicely and gave it (what I thought was) a decent base.
I let this dry and add another Plasti-kote coat. This was like I had dribbled slightly tinted water over it.
Let this dry and add another coat - mmm?? - it might be OK.
It did occur to me somewhere during all this I could have just left the original perspex (glass) in and painted that rather than demolish the whole thing. I don't have any handy tips for avoiding'stupid'.
As things stand right now - this will do me for the front door rather than buy another and chuck this.
So here we are..... all the interior decorating is done (and written about for DH&MS) so I am on target - nice feeling.
I am not sure about all the walls having the same idea of the chair height border. The problem upstairs was twofold.... I couldn't find appropriate wall paper for the period or even anything else that I liked. I even bought two lots and rejected them! I was then left with just paint and that is too boring. The rooms won't take coving or ceiling border because of the dropped ceiling at the front of the building so I seemed to be left with ..........
Someone kindly reminded me that once 'filled' with furniture and stuff it will all look very different. Hope so because, right now, it looks pitifully boring.
The border in the shop is an 'essential' as it is in the movie. Vianne has stencilled a border round the shop walls so I really wanted that to happen. I did it with stamping. This included stamping of feet too when it didn't go well. I had never done it before and when I was first trying it I was totally useless - see the photo!
I took a lunch break and went back to it and by then just didn't care any more and with that attitude, guess what, it worked like a dream. The secret to success is just 'do it'. I also applied the ink to the stamp using the ink pad instead of trying to ink up the stamp by pressing it on the ink pad. No idea if you should do it that way but it worked like a charm for me. I got the idea of 'sloppy' stamping when I dropped the stamp on the paper accidentally and that produced the best print of all!
Go for it is now my motto.
Another discovery was ....
I needed to cut out film to make frosted glass on a shaped window. Not easy to trace and no outline to draw round. Easy peasy - I photocopied the door and cut out the window. Voila a perfect template to enable me to cut out the plastic.
That said - I don't like the end result. The cutting out is fine but the glass just doesn't look frosted or right some how. I think I might buy a new front door with no glass. Better for a front door any way but it is a pig as it means more money and more painting.
This method I have done for a long time. If you want to line up a border round a room forget pithering around measuring and drawing pencil lines and then trying to just cover them up etc etc. Cut a piece of card the right height and just slide it around as you work.
I also use cut up cards for transferring measurements from one place to another - so much easier than fiddly measuring and marking.
That's it for June then - see you next month.
I have written four posts today - this one followed by another three.
I have a rotten time finding floors for all my projects.
The mass of stuff is printed paper - like wallpaper. It just doesn't have the 'weight' to look right.
In Bentleys I did end up sticking a piece to card to make it look more lino-ish - but it isn't great.
The next choice up is printed card and these are varying qualities to say the least and always look like printed card. Tile prints are usually super-shiny. Project after project gets floored in wood for sheer lack of choice.
 Happily I came across mmminiatures - an EBay shop. It was offering lovely looking wall tiles and one of the patterns gave a suggestion of the tiles in Chocolat so I asked if the wall tiles would join up OK to fit a floor. The owner decided she would have a go at making floor tiles; so she enlarged the tile a little and printed out three A4 sheets. They are absolutely wonderful. Printed in a sort of silky finish - not dull matt but not super shiny. The material is a sort of laminate not card or paper so has the weight and feel of a 1/12th tile or lino. I am sure if you wanted even more authenticity you could cut the tiles into individuals and then lay them down to get the ultimate 3D gap between them. I have every intention of doing that in my next project in a smaller (kitchen or bathroom) area.
She has gone on to create and offer more patterns this size and produce wonderful lino reproductions. Her rugs are also lovely. I am thrilled to find her - go check it out, even if you don't need anything now this is a site to bookmark for when you do.
Hold a piece still with the point of a BBQ skewer or anything similar (knitting needle?). the point doesn't leave a mark and any way you can flick over it at the end. You can shove the piece around as you need to and even shuffle it off to the drying area afterwards.
Use a sponge brush for staining wood - instructions say a lint free cloth - that's a bit of a challenge and messy on the hands.
Use a table lamp to speed up the drying process if needs be - not too close or too hot just gentle warmth.
Use a nail brush to thoroughly wash out your brushes so you don't get a build up of paint where the bristles are held at the neck.
I have had all my brushes for years - if you use water-based products and wash the brush as soon as you finish with it they go on and on. You can't let the small brushes stand for even a couple of minutes as they dry out very quickly and are harder to clean if you let that happen. Just get into the habit of - 'done that/wash the brush'.
I bought new doors for Chocolat knowing they were too small.
The interior door isn't a problem as I think that the space is so disproportionately large it looks like an archway so it will have a curtain or even a bead curtain (very hippy/beatnik) to divide the sitting room from the bedroom.
This still left the problem of the outside door.
 Being me, I couldn't be faffed getting Ken to drive me miles to the nearest decent size craft shop to see if they have the right size bit of wood to fill the gap. Don't ever try and get an answer to that on line or by phone!
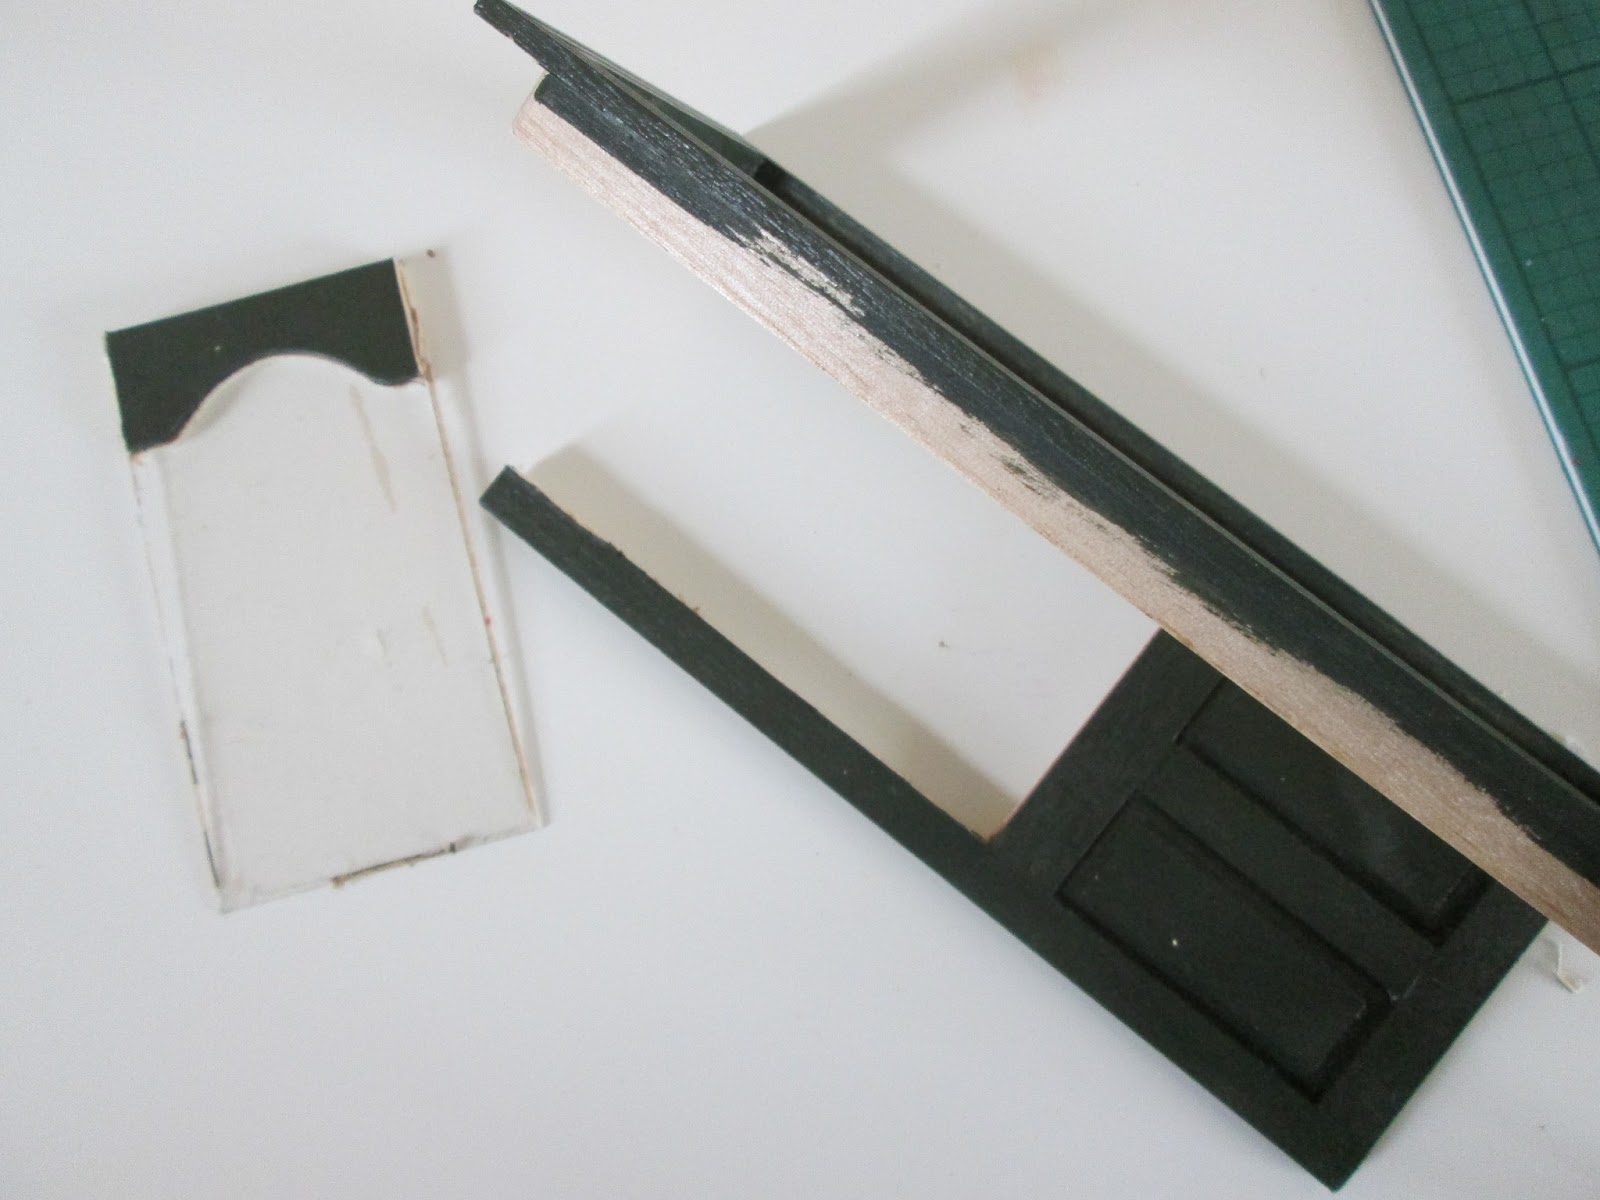
What had I got in my rummage box? Mmmm some really battered door frame that I had ripped out from O'Rourkes fitted quite well. I cleaned it up a little and glued it in place.
The front face of this was smooth and level and the rough part at the back would be fine if I went over it with filler.
 I then had an even better thought - was there another bit of wood that would fill that gap? My other half suggested skirting. I knew the thickness was fine but it was too wide - he deftly cut it with a craft knife. Oh for a set of muscles for Christmas.
I shaped the top right corner so it went inside the curve, we now had a perfect fit.
Bing, bang, bosh, that was glued in
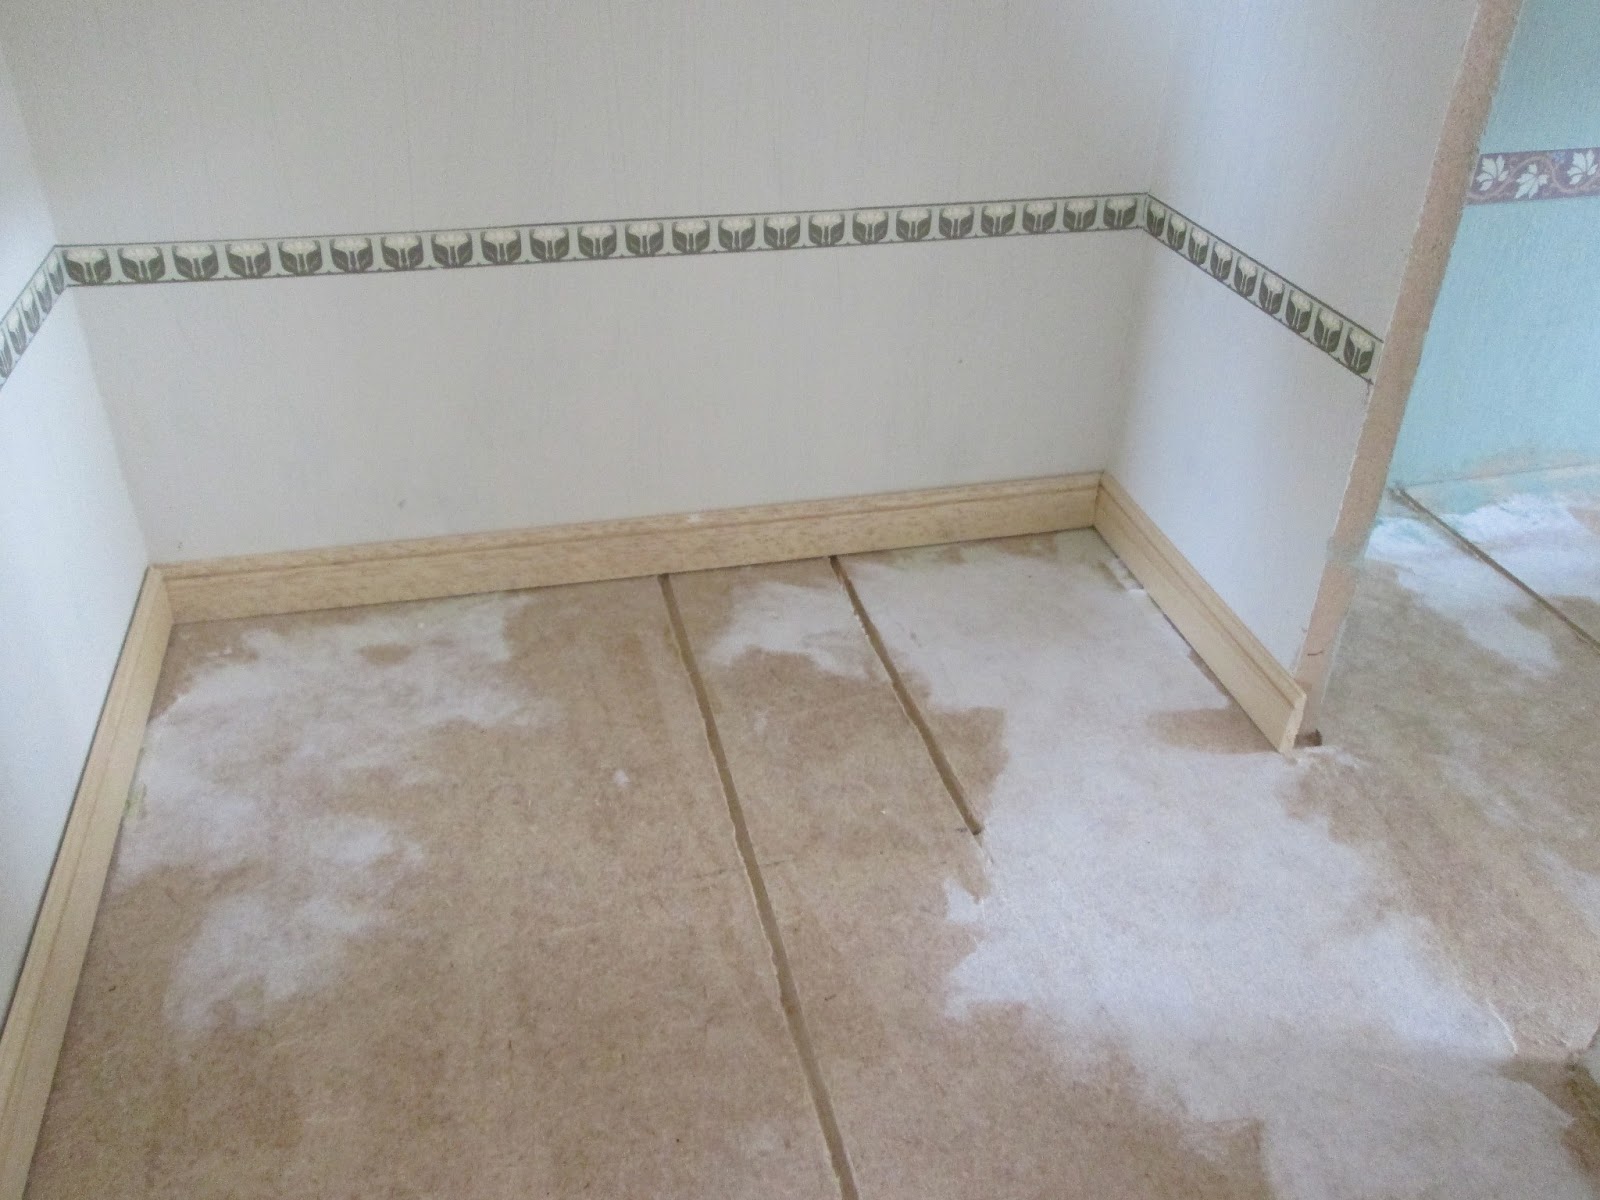
The inside just needed a bit of filler in the curve at the top and the slit between the wall and wood on the inside was 'filled in' with paint, applied with the miraculous micro brush - love 'em.
It now has a bit of border added and you wouldn't know there was ever a problem. Door fits snug as a bug.
June is the Interior decorating month. I really do have to stick to the schedule to the nth degree. The main reason is that Chocolat has to be finished by the time we go back to Naples at the end of October is that I am writing a series of eight articles about it. Once I have left here there is no chance to do anything to it or photograph it so even though the articles have an autumn winter deadline Chocolat still needs to be complete before then. June is the month that the interior decorating must be finished.
So far (17th) it isn't going well.
I started by having a lot of cleaning up to do on the carcass before I could start to paint.
Time consuming and not fun.
I then realised I had to put the sloping roof back on so I could work out where the room ended and the outside began. This turned out to be another grrrrr! moment. The original builder had fitted it wrongly and I had to fill the original holes and start again. More time used up and not a paint brush lifted.
Finally today I did some painting.
Be careful what you wish for.
I turned the house upside down and painted the ceilings. They have a very poor finish thanks to various lumps and bumps still there because I removed the coving. There are traces of glue and dints and generally not good. Even the main ceiling areas aren't great. I have no idea what it was originally painted with - oil-based paint I think - but all the sanding in the world doesn't seem to get it down to a decent base to paint over. I think it will be OK if the lights light downwards and not upwards, which they should do.
The next stage is the one really worrying me. I painted the two upstairs rooms and the finish is just awful. I can't get the paint to stick in various spots and it pretty much refuses to cover the original white paint which is daubed down the walls. The other issue I am having is that in a new kit I would have done this before building and used a roller and got a good finish but on this re-do I am poking around with a brush and leaving dreadful brush marks.
I am praying that the magic sponge that I bought which claims to rub down paintwork will come up trumps and give me a finish good enough for a second coat to look better than this.
Luckily Chocolat is supposed to be an old and neglected shop which Vianne has just given a lick of paint to clean it up, so it would have had pretty scabby walls I guess.
Tell me its going to be OK
Last Sunday (9th) I went to the Warners' Dolls House Show at York race course. It is a favourite of mine as it is a good size show in a comfortable venue. I shan't blather on too much about the show here - I have just written the review for DH&MS magazine so I feel all written out about it. Besides which, unless there is something momentous to share, there's not a lot to say about a show if it is a good one!
I got there half an hour before it opened to meet the organiser - pretty much as always this is just to show your face and reassure him/her that you know what you are doing and won't bother people or do stuff without permission.
I don't get any privileges from being 'staff'. With the exception of one show I always pay to go in and don't go in until everyone else does. On this occasion I was first through the door just slightly ahead of the other folk who bought a ticket in advance. Generally the tickets are cheaper and usually give you access to the show earlier than the general public.
York, like most shows, is a scrum for the first couple of hours and then calms down after lunch. Everyone is worried about missing that special one-off piece that will be snatched up in the first ten minutes. I work on the principal that if I don't know it exists then it doesn't!
So, for me, doors open and I am off to do my stuff..... working and shopping.
First stop was to do a swap with Matlock Miniatures. I had bought a couple of pieces at Pudsey because I was too keen to wait for the ones I really wanted. Lynn was really kind and let me take them back and swap them for the real McCoy.
They had made me the right length bar and brought me a prep table which is narrower
than the kitchen table I'd already bought.
The bar was finished for me but the table is ready for me to do. I don't really mind which way I do this but, obviously, the unfinished piece is loads cheaper.
This photo gives it weird proportions. I promise you it is an excellent piece.
The other thing that was waiting for me was the working latch from Sussex Crafts. Here it is in bits and pieces out of the packet, but I also got the see the thing in action on a lovely privvy door on their stand.
If you want to see that and the other 68 photos from the show there is the usual web album; just click on this link photo album
These packets were all from a vendor whose name I never noted. To be honest it was a stall I wasn't all that interested in but, you know how it is, you just have to have a look. The first thing I found was the little statue which I have wanted for a while but didn't want to pay the postage for. It costs 20p more from Pheonix plus postage - this cost me £2 and it has been 'finished' too. In Chocolat Vianne makes a similar figure in chocolate for her window display. Mine is probably destined for that. I also got some door furniture, knobs for some cupboards and a sliding bolt - all for better than usual prices.
I love these slightly tatty chimney pots for £1 each. They just need some smokey insides and they will be great. Two are to go on one chimney and one on the other for the three fireplaces that used to be in Chocolaterie Maya.
This, I hope, was the good find of the day. It is supposed to be a cutter for my not-Dremel for cutting grooves. This cost the princely sum of £1 from my favourite tool supplier - S & M Tools. Maybe not a great name if you have to Google it?
Any way they are my favourites because - they appear at shows here and there, they are cheap and, best of all, they know their stuff. Just tell them your problem and they have the tool.
I was told three times (with the added instructions to take notice of what he said) that it needs to be pulled not pushed. His eyes did roll when I told him I had made grooves with the diamond burrs, so he knew he was dealing with an idiot.
This is my pathetic purchase of the day - 60p worth of red cotton.
I am hunting for a 'wool' weight fabric fine enough to make two red riding hood type capes for Vianne and Anouk. The cloaks seem to be very symbolic and memorable in the movie and I want them to hang at the foot of the stairs and/or in the bedroom. I cannot find any soft, easy to drape, in-scale, warm looking fabric so, in desperation, I bought this but I know I won't use it. Why do I do that? I think it is a sort of comfort when you can't find what you want - you have to have something.
In six hours that was all I bought. Incredible. I took a wodge of money and spent £26.60!
 The wodge was to buy nine lights for the project and flooring for the shop. Neither of which I found. There were tons of lights there on several stands but they are all the same Chinese made stuff. The exceptions being Small World Products and Ray Storey; both of whom make lovely lights but they are beyond my budget. On this occasion, though I haunted their stands a dozen times, even they didn't have what I wanted. I eventually got into conversation with Ray Storey and he said he could make me the simple lights I wanted for about £7 each. I was doing cartwheels and have ordered them for me to pick up at Miniatura in September. This does screw up the order in which I intended to work on Chocolat but I really don't care if I get the lights I want.

In the same vein I also asked Kathy Holden at Delph if she could make me a single ring hot plate like the one in this picture. Not a problem other than I was worrying that it was going to cost a lot of money and I was being just daft spending a lot on a piece of room dressing. She reckons she can do it for around £8.
Aren't these people just the best!!!
I did buy some not-happy-with-it-as-it-is floor paper. It is at least a mucky brown and cream colour rather than the spanking black and white you generally get offered and very cheap at £1.20 a sheet - so I can shove it out of sight in the stash if I don't use it. You can see it roughly in place in the following shots.
As soon as I got back I had to reassemble stuff to see how it was all going.